
It’s just not Halloween without candy corn! Here’s another fun project that comes together in a flash.

These make great decorations, or you can add some crinkle material and a rattle insert for a fun toy for your little one! These would also be a fun addition to the kids’ table on Thanksgiving.
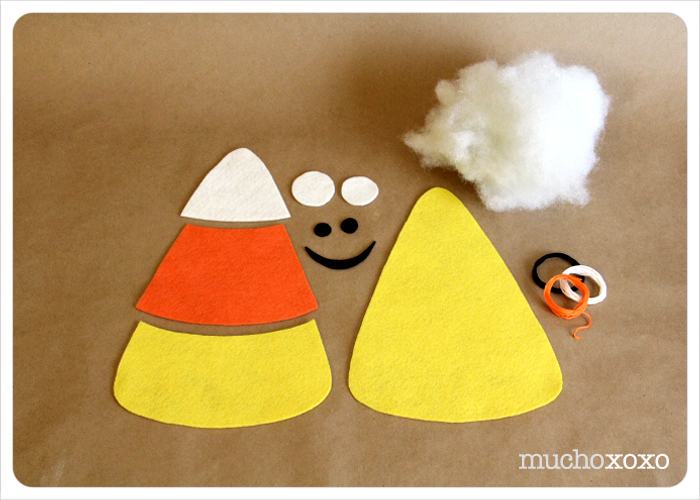
Materials:
- white felt
- orange felt
- yellow felt
- black felt
- coordinating embroidery thread
- stuffing
- crinkle material (optional)
- rattle insert (optional)
- interfacing (optional)
- basic sewing supplies (needle, scissors, pins, etc)
- pattern (available here)
This is a fast and easy project that can be done by hand or on the machine.
Step 1: print and cut your pattern and then cut your felt pieces.
Step 2: sew your white/orange/yellow strips together. I used the solid back piece as a guide for lining up my strips (shown below left). I did this step on the machine, sewing fairly close to the edge. Since I will be hand stitching the rest, I chose not to backstitch at the end of each row. Instead, I pulled the thread through to the back and tied it off.

Step 3: sew your face to the assembled front piece. If you decide to make more than one, consider giving them all slightly different expressions. (btw, they’re also pretty cute without a face).


Step 4: if you choose to add interfacing, now’s the time (I used Pellon Shape Flex). I would recommend this step especially if you plan to hand stitch your pieces. It adds a little reinforcement to the felt. I opted to iron and trim it after I sewed the strips together and added the face. It covers up the stitching and fabric flaps nicely so you won’t have to worry about snagging it when you add the stuffing. And the blanket stitch does a great job of hiding your edges, in case you’re worried about the interfacing showing.
Step 5: once you’re happy with the look of your face, place your finished front piece on top of the back piece, wrong sides together, and pin.

Step 6: blanket stitch your pieces together, leaving a 2” opening. If you’re unfamiliar with the blanket stitch or need a refresher, check out this great project with very clear step-by-step instructions. The blanket stitch uses a surprising amount of thread and can vary greatly depending on how close you place your stitches, so be prepared!
Step 7: stuff with crinkle material (optional) and stuffing. Use small pieces of stuffing to ensure you get it nice and full.

If you choose to add a rattle insert, try to place it towards the center. Not sure where to purchase crinkle material or rattle inserts? I get mine here.
Step 8: when you’re done stuffing, continue your blanket stitch to close up the opening. You may want to add a bit more stuffing as you close the opening. Once you’ve reached your starting point, tie it off, bury your thread and trim.
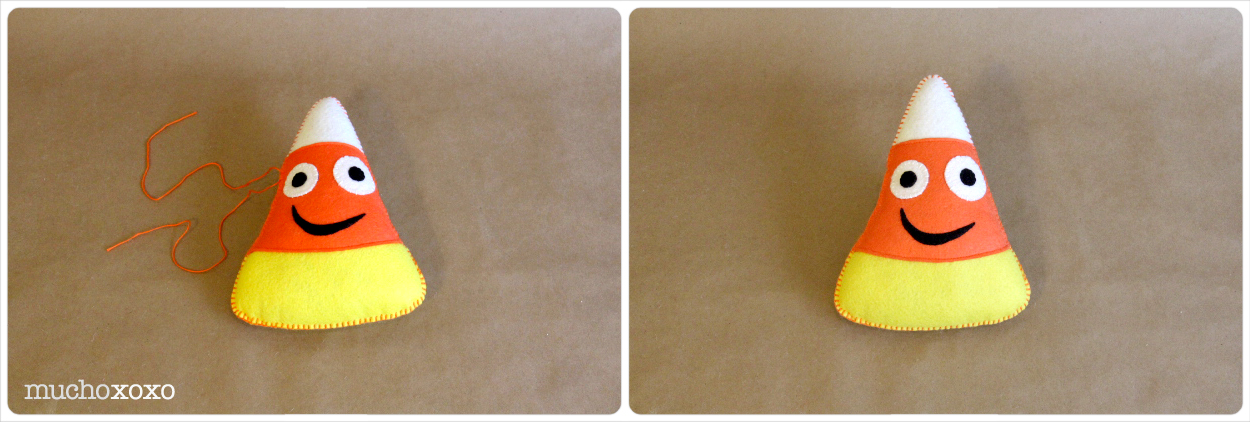
And that’s it, a candy corn buddy that’s good enough to eat!
 xoxo
xoxo
