michael miller fabric challenge: pyramids in blue

Finally sharing my finished quilt for the 2016 Michael Miller Fabric Challenge!

mqg_fabric_challenge_2016

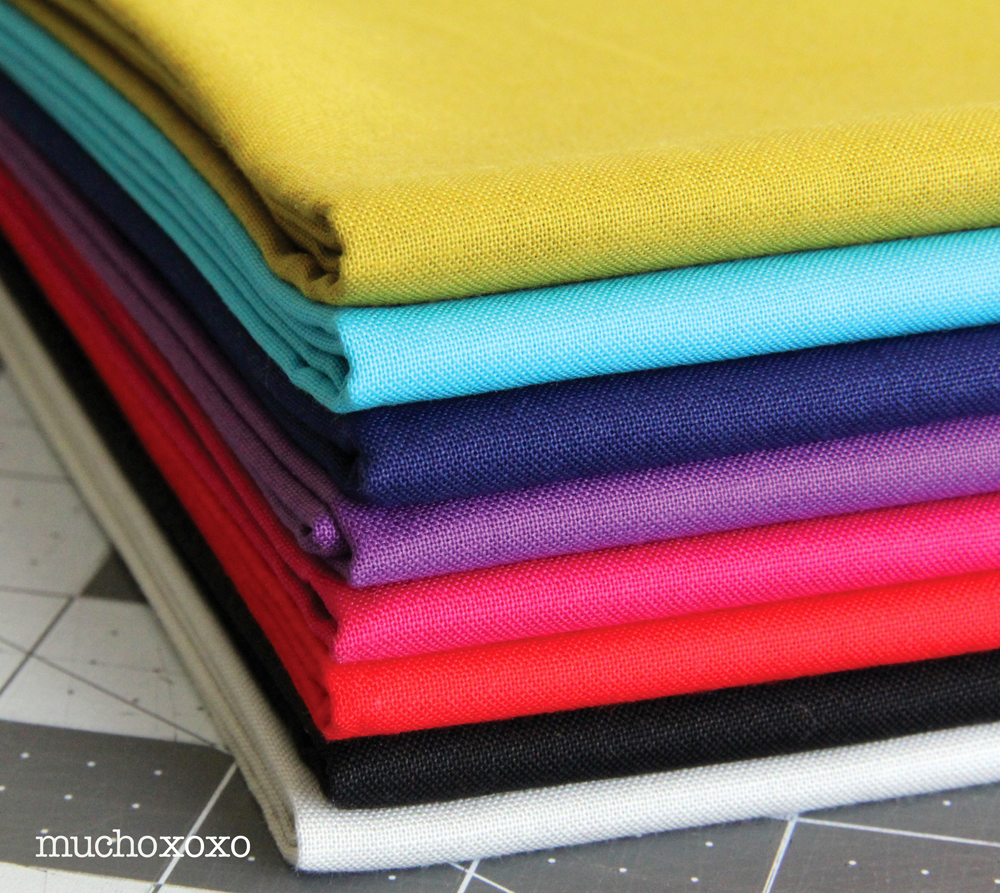
I love a good challenge, and this was a tough one! From the new Luxe line of 108″ wide back cottons, I received a piece of Tumble Blocks in Lagoon, as well as a Luxe solid in Luna. I adore the colors, and the fabric is so soft, with a subtle sheen.

luxefabric

I’m a big fan of letting the fabric tell me what it wants to be. But sometimes, the fabric just doesn’t want to talk. After spending some time with it, I was feeling pretty stuck. So I decided to take a risk and deconstruct the print. I cut the fabric into the different sections of colored stripes, and was left with a pile of squares, diamonds and other odd shapes.

Welcome to the point of no return.

Luxe_Fabric_Deconstructed

I started playing with the small cuts of fabric and… Ding! Finally! Inspiration!!! I decided to use the stripes of different shades to create the illusion of dimension and shadow. I created a paper piecing pattern, which ended up being very helpful when working with such small (and slightly slippery) pieces. It also made angling my stripes considerably easier.

mqg_fabric_challenge_2016_8

A lot of my fabric pieces were so small that I had to join them together to create a large enough piece for the block. Just call me Dr. Frankenstein.

I challenged myself to only use the fabric provided (along with a coordinating Michael Miller solid from my stash), so I knew that whatever I made would be small. This bad boy comes in at a whopping 16 3/8” x 16”. So little!

mqg_fabric_challenge_2016

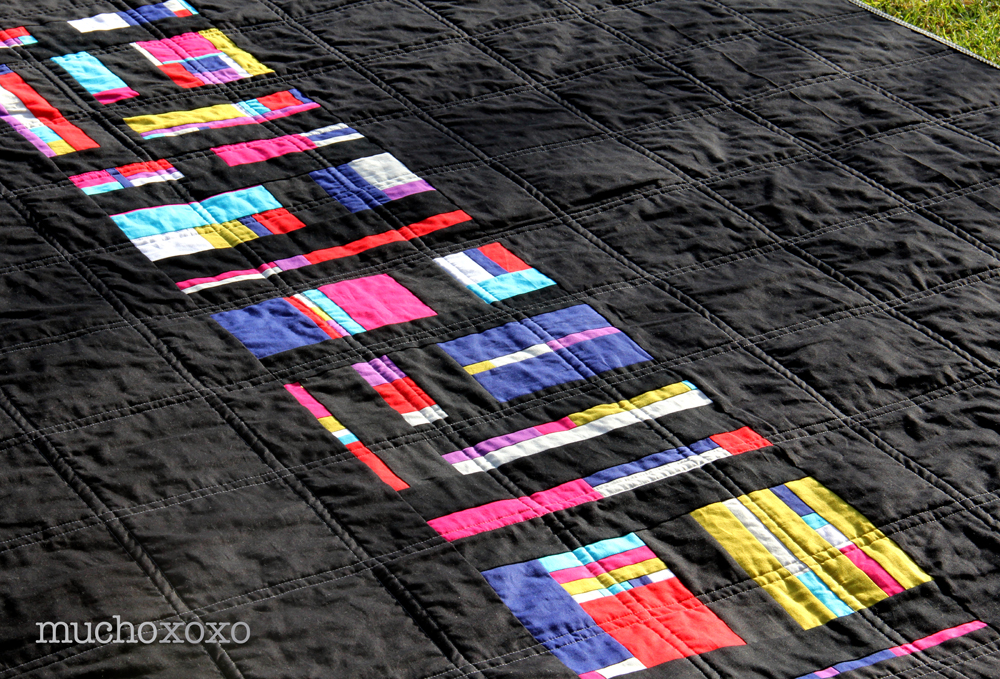
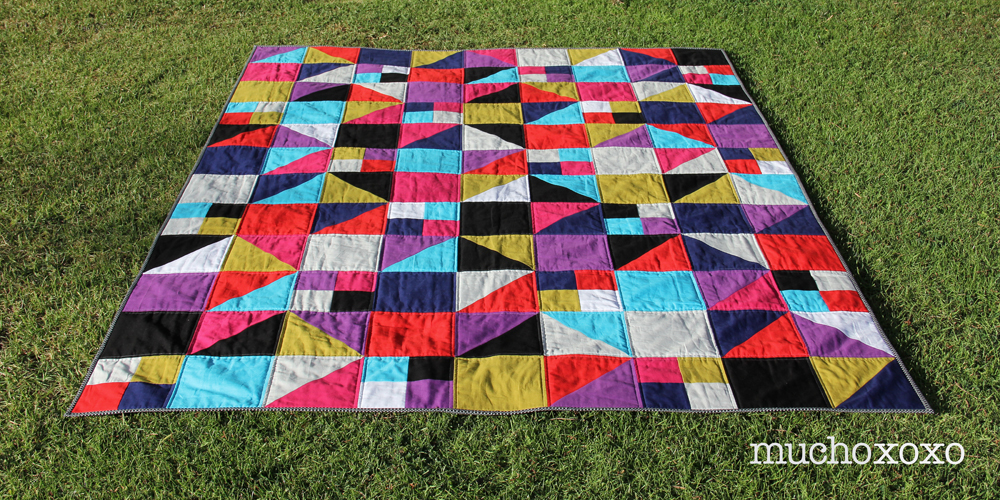
I made as many pyramid blocks as I could with the fabric I had, and then started playing with a layout. In the end, I decided to stack them to one side and use the solid as a background and binding.

I used three coordinating shades of Aurifil 50wt for the quilting, following the angles of the HSTs. Matchstick quilting is labor-intensive, but it’s so worth it! This was the one time during this process that I was happy to have such a small quilt to work with.

mqg_fabric_challenge_2016

This was a fun exercise, and I’m pretty pleased with the final result.

OH! And did I mention that this quilt was accepted into QuiltCon?!?! I kind of can’t believe it. I spent a good while waiting for an email saying they had made a mistake. It’s not perfect, but I love it and I’m happy to share it with this awesome community. And I’m proud of myself for getting over the fear of entering a quilt show! I only wish I was going to QuiltCon this year so I could see it in person.

mqg_fabric_challenge_2016

So there it is, my little blue baby. I’m thinking I may need to make a throw using this quilt block now.

Have a great day! And if you’re heading to QuiltCon, I’m incredibly jealous and plan to live vicariously through your Instagram feeds ;)

xoxo

quilts for pulse

Following the horrific attack on Pulse Nightclub on June 12th, the Orlando Modern Quilt Guild put a call out to help make quilts for the survivors and victim’s families. Quilters all over the country, and many abroad, were quick to mobilize and began sewing, sending supplies, and doing everything they could to make sure they reached their goal.

Scrappy Heart Block

Along with the two scrappy heart blocks I made for the quilts from the LAMQG (tutorial by Crimson Tate), I knew I wanted to design and make a complete quilt. But what should it be?

I grew up surrounded by love of all kinds. It was beautiful, and inspiring. And something to be celebrated. This is what I decided to focus on when I sat down to design my quilt. I wanted to create something bright and cheerful. And I wanted it to be bold, because LOVE IS LOVE IS LOVE IS LOVE!

So, without further ado, here’s my finished quilt for Pulse!

Quilt For Pulse

Something about nested or double hearts just felt right. And I couldn’t help but set them against the high contrast of a checkerboard background. I kept the back much simpler, so the quilting and focal fabric really stand out.

Quilt For Pulse

I designed and printed the “love” fabric on Spoonflower a while ago, and I couldn’t think of a more perfect use for it. I just love how it looks surrounded by the rainbow of Kona Solids.

Love Fabric

I used my favorite grey Aurifil 50wt to quilt around each heart, as well as on a few key diagonal, horizontal and vertical points.

I’m so pleased how this turned out. I’m already itching to make another one. And I’ve started writing a pattern for it, so stay tuned for that!

Quilt For Pulse

So, there it is. My quilt for Pulse. I hope it will bring the recipient some comfort in this difficult time. May it serve as a reminder that they are not alone, and they are loved.

I’m happy to report that not only did the Orlando MQG meet their initial goal of 102 quilts, they far surpassed it. The current total is over 1,000 quilts, and more are still coming in. If you want to see what other quilters have contributed (and get a good dose of the feels), you can search #QuiltsForPulse on Instagram.

LOVE WINS!

xoxo

2016 FAL

Linking up with the 2016 finish-along for Q3. I finished something! Woo!

eek! halloween softies!

Looking for some fast, fun, and easy Halloween projects? How about three! These little felt friends are quick to make, and loads of fun!

halloween felt softies

These guys are equally great as decorations or toys. My nephew was particularly fond of the bat (he has crinkle material in his wings!). I love the idea of a bowl full of the candy corns as party favors. And the eyeballs are just begging to be made into a throw pillow! Really, the possibilities are endless.

Ready to make your own set of Halloween friends? Follow the links below for full tutorials and patterns.

Eyeball Softie Pattern  Candy Corn Softie Pattern  Vampire Bat Softie Pattern

Happy Haunting!

xoxo

cushion cut quilt: pattern testing & a giveaway!

I’m so excited that I can finally share what I’ve been working on over the past weeks! Caroline of Nightingale Quilts has just released a new quilt pattern, called Cushion Cut, and I was lucky enough to get to pattern test it. Here’s my version, in all its glory/craziness!

muchoxoxo Cushion Cut Quilt

The pattern plays with tone/value to create a fun 3D effect of a cushion cut gem. I decided to try to achieve this using only black and white. I’ve also been dying to have a go at fussy cutting stripes and this seemed like the perfect opportunity. I almost drove myself mad (not to mention blind) trying to plan this out, but it was worth it. I am completely smitten with how it turned out. It almost doesn’t look real!

muchoxoxo Cushion Cut Quilt

The quilt top came together fairly quickly. I think I spent more time planning and cutting than actually sewing! I chain-pieced a majority of it, which is always a great time saver. I had every intention of having a finished quilt for the pattern release, but work/life derailed me. What can I say? Best laid plans… That just means I get to share more with you lovelies again soon ;)

I love it so much, I can’t wait to finish!

muchoxoxo Cushion Cut Quilt

The Cushion Cut quilt pattern has all the information needed to make the quilt in 4 different sizes, from cot to king. (I made the throw size– 60”x84”). Caroline has written a fun pattern that everyone will enjoy, from confident beginners to seasoned pros. It is equally suited for solids or prints, fussy or carefree cutting. This pattern really is perfect for putting your own spin on. The possibilities are endless!

A number of talented quilters participated in pattern testing, you can see their fantastic versions of the quilt at the following links:

Quilting it Out | Daydreams of Quilts | Skyberries Handmade | SkinnyMalinkyQuilts | Jolly and Delilah | Modern Cozy | Sunflower Quilting | Frankie’s Fabrics | Stitches by Laura

Excited to give the Cushion Cut quilt pattern a try for yourself? Caroline has generously given me the opportunity to give away a PDF copy of the pattern to one lucky winner!

muchoxoxo Cushion Cut Quilt

*** THIS GIVEAWAY IS NOW CLOSED ***

To enter the giveaway:

  • Leave a comment letting me know what you would make with the pattern if you win. (A gift? Something for you? Would you use solids or pull out a coveted print from your stash?… You get the idea).
  • Earn a second entry by following me on instagram (I’m @muchoxoxo). Just leave a separate comment that you follow (include your IG name).

*The giveaway is open to everyone. Only two entries per person please.

*The giveaway will remain open until Sunday, August 30th at Midnight PST. One winner will be chosen at random and announced here, as well as being notified via email, by Monday, August 31st.


Congratulations to SHAYNA for being the lucky winner!!! I hope you enjoy this pattern as much as I have been! Have fun, and happy sewing!

PS- the first name randomly drawn was my good friend who, thanks to me, definitely knows more about quilting than he ever wanted to (he’s also holding the quilt in the pic because he’s tall and helpful like that). He doesn’t sew but got a big kick out of winning. He’s very happy that the pattern is going to a good home :)


The Cushion Cut quilt pattern is available now in Nightingale Quilts’ Craftsy shop. She also has a bunch of other great patterns, check them out!

A very big thank you to Caroline, and congratulations on the fantastic new pattern! I suspect we’ll be seeing many more of these soon. And if you make one, be sure to share it on Instagram and tag it #CushionCutQuilt.

Have a fantastic weekend! And good luck!

xoxo

*** THIS GIVEAWAY IS NOW CLOSED ***

what shade are you? blog hop & giveaway

You guys, I’m so pumped for today’s post! I was asked by RJR Fabrics if I’d like to be part of their What Shade Are You blog hop, featuring Cotton Supreme Solids, and of course I jumped at the chance!

Blog Hop 2015 logo C small

Solids are my first love, so I was excited to get in on the fun.

I knew I wanted to do something simple, graphic and bold. I’ve had an idea in my head for a while, and this seemed like the perfect time to try it. So, with my pattern in mind, it was time to choose my fabrics! After browsing the beautiful range of colors, I decided on this palette of lovely jewel tones.

cotton supreme solids

colors from top to bottom: goldilocks, turks & caicos, night, purple haze, rhododendron, chili pepper, black, on the rocks

So, here it is!

cotton supreme solids quilt

The quilt is a combination of squares, HSTs and 4-patches. The finished size is 63″ x 84″, perfect for curling up on the couch with a big glass of wine cup of hot tea. I’m a big fan of bright colors and high contrast, but this pattern would look great in any palette. I may have to try it with prints too!

For the back, I took all my leftover bits and did a little improv panel to break up the black. I kind of LOVE IT.

cotton supreme solids quilt

I bound the quilt with Netorious in black from Cotton + Steel. Yum! I kept the quilting simple and stuck to the grid. I used a lovely grey Aurifil 50wt that blends beautifully with the different colors. It’s already so soft, I suspect this is going to be deliciously cozy after a wash and fluff.

cotton supreme solids quilt

This was my first time working with Cotton Supreme Solids, and I have to say I’m completely smitten! The fabric is super soft with a nice drape, and it sews up like a dream! They definitely give other premium solids a run for their money. And if you like working with Cotton + Steel fabrics, you’ll love these!

If you use a lot of solids, I’d recommend picking up a color card for easy reference and to take the guesswork out of online ordering.

cotton supreme solids card

Ready to give Cotton Supreme Solids a try? RJR Fabrics has generously provided a fat quarter bundle of my color palette to give away to one lucky winner! (The lighter blue is missing from pic but will be included in the bundle).

rjr fabrics cotton supreme solids

**THIS GIVEAWAY IS NOW CLOSED**

To enter the giveaway:

  • Leave a comment letting me know what you would make with these.
  • Earn a second entry by following me on Instagram (I’m @muchoxoxo). Just leave a separate comment that you follow (include your IG name).

*Only two entries per person please.

*The giveaway is open to the US and Canada. Sorry, no PO Boxes.

*The giveaway will remain open until Wednesday, April 15th at 9pm PST. One winner will be chosen at random and announced here, as well as being notified via email, by Thursday, April 16th.


Congratulations to RUTH R. for being the lucky winner!!! I hope you enjoy working with these fabrics as much as I did :)


Be sure to visit the RJR facebook page to check out the other participants’ projects. There’s some great stuff, and a new post goes up every Friday.

cotton supreme solids quilt

I think there might be a little nap in the sun in my future.

have a great weekend!

xoxo

**THIS GIVEAWAY IS NOW CLOSED**

orange peel quilt-a-long: appliqué

orange peel qal

It’s time for another Orange Peel Quilt-A-Long update! I’ve made a lot of progress since my last check-in, and have definitely found my groove with this project. Once I figured out my basting technique, finishing the rest of the peels was fairly easy. So with a big batch of peels basted and a nice stack of backing fabric good to go, I was ready to attempt my very first appliqué!

OrangePeelQAL_ready

Again, I struggled a little in the beginning. But I found my rhythm and a method that works for me, and I just kept going. I found that my peels sat flatter on my backing and were easier to hold while stitching if I used slightly bent pins. Not necessary by any means, this is just what worked for me.

OrangePeelQAL_pinned

I strayed a little from Julie’s appliqué instructions and did what I’m calling a modified ladder stitch. Traditional appliqué has you come straight up through the back and catch a few threads at the edge of your piece. I had a very hard time with this! I felt uncoordinated and sloppy. So instead, I came in at a slight angle, went out through the fold/corner, and straight down to the back.

Orange Peel QAL stitching

(I did a slightly exaggerated angle here so it was easier to see)

For me, this method was much easier. And the paranoid quilter in me feels like this will be more durable in the case of regular use and multiple washings.

Orange Peel QAL progress

So that’s where I’m at! I’m still not exactly sure what size this is going to end up. Right now I’m just making peels and enjoying the process… I’ll run out of backing fabric soon, and then I guess I’ll know I’m done! Then it will be time to choose my layout and trim blocks :)

Stay tuned for more Orange Peel QAL fun. And in the meantime, hop on over to button-button and take a look at everyone’s progress! You can also take a peek on Instagram by searching #orangepeelqal2014.

xoxo

orange peel quilt-a-long: fabric + prep

orange peel qal

Things definitely got off to a slow start with my orange peel quilt (too many projects going at once, maybe?) but I’ve made up for lost time and I’m back on track! Let’s start at the beginning, shall we?

The first task was pulling fabric. My only rule (as always) was that I had to pull from my stash. I knew I wanted to use color, and lots of it. So, I finally decided to go for scrappy/random peels in a range of colors on a neutral low-volume backing. Now, my stash has plenty of colors and bold prints, but neutral? I hardly have any! I did have a fun grey polka dot fabric that I’ve been wanting to use, so I decided to go with a uniform backing for the peels.

OrangePeelQAL fabric

This is my first fabric pull, and I’ve since continued to add to it from my stash.

In the spirit of catching up (and planning ahead for being without my sewing machine for a few days), I cut 30+ freezer paper peels so I could just go go go! I went ahead and started ironing them to the fabrics I pulled. I decided to only do one peel per print, no repeats.

OrangePeelQAL ironed

Then it was time to baste. I tried one… And, wow! It was a complete disaster! It was SO bad… This was my first time working with freezer paper, and I clearly didn’t iron it long enough. So before I was even half way through basting, the freezer paper started to release from the fabric and slide around. It makes it almost impossible to get a good grip on the fabric. No bueno.

(This is where the picture of my failed basting attempt would go, but it was so epically bad that I immediately threw it away. Yes, it was really that bad.)

Honestly, it was a little discouraging. But I was determined to keep going. Don’t let one bad peel ruin the whole bunch, right? I re-ironed all the peels to make sure the freezer paper had a nice strong hold. And I was ready to give it another go. It took a few peels to figure out a method that worked for me, but once I did they went pretty fast. Phew!

OrangePeelQAL basted

One thing I did in addition to Julie’s basting instructions that I found very helpful was to quickly finger-press the peels before sewing.

OrangePeelQAL fingerpress

It creates a nice crisp fold and made the sewing go much quicker for me.

Orange Peel QAL detail

Next up, appliqué! More on that very soon, so stay tuned. In the meantime, hop on over to button-button and take a look at everyone’s progress. You can also take a peek on Instagram by searching #orangepeelqal2014.

Have a great week!

xoxo

pattern testing: high tea quilt

The lovely and talented Adrianne of On the Windy Side has just released her first self-published quilt pattern, called High Tea, and I was lucky enough to get to pattern test it before the release. Here’s my finished High Tea quilt top!

HighTeaQuilt_square_1

The High Tea quilt pattern is super versatile, and would work equally well with pre-cuts or as a scrappy stash-busting project. I chose to use high-contrast black and white prints, most of which came from my stash (a current requirement for all of my projects).

high tea quilt detail

The quilt top came together quickly and without too much trouble. (The only problem I had was 100% my own fault because I was paying more attention to Top Chef than my sewing). I absolutely love how it turned out, and I can’t wait to finish it!

Adrianne has written a fun and easy-to-follow pattern that quilters of all skill levels will love! The pattern has all the information needed to make the quilt in 5 different sizes, from baby to queen. (I made the cot size– 43” x 56”).

A number of talented quilters jumped in to help test the pattern, you can see all of their fantastic takes on it in Adrianne’s post here.

The High Tea quilt pattern is available now on Craftsy and Adrianne’s Etsy Shop. It will be available at a discounted price for a very limited time to celebrate the release, so pick it up now!

high tea quilt

I clearly had a terrible time taking pictures ;)

A big thank you and congratulations to Adrianne on her first pattern release. I have no doubt that it will be very well-received. And if you make one, be sure to share it on Instagram (tag #highteaquilt and #onthewindysidequilts) or in Adrianne’s Flickr group.

Have a fantastic week!

xoxo

100 quilts for kids 2014

100 Quilts for Kids wrapped up last week, and now that I’ve had a moment to breathe, it’s time to share!

100 quilts for kids

I managed to finish 5 quilts to contribute, and I’m SO happy with all of them.

quilt #1: strips & stripes

100 quilts for kids

For my first quilt, I went with a simple strip pattern. I love how it shows off this adorable fabric (Folk Tale Bird Cages by Natalie Lymer). The colors are so bright and refreshing, and the sweet little birds just make me smile!

100 quilts for kids

I did double rows of stitching instead of just one, and I love it! I especially love the little something extra it gives to the solid coral back. This is a great pattern for beginning quilters, or anyone looking for a quick and fun weekend project. It’s also perfect for showcasing prints that you just can’t bring yourself to cut up too much.

100 quilts for kids

The finished size is about 42″ x 42″. This quilt is going to Project Linus.


quilt #2: gingham checks

100 quilts for kids

My next contribution is this fun gingham check quilt. I’ve been wanting to make one of these for a while. I have a pretty big stash of solids, so this was a great way to bust through some of them! I used Kona solids in White, Robin Egg and Lagoon for the front and binding. I knew I wanted to offset the solid front with a printed back, but I didn’t really have anything in my stash that felt right. Luckily, I found a cute print at Jo-Ann Fabric during a crazy clearance-on-top-of-clearance sale. Who doesn’t love monkeys, dogs and frogs!

100 quilts for kids

I did a single row of stitching on both sides of each seam. Clean and simple.

100 quilts for kids

The finished size is about 40” x 40”. This quilt is going to My Stuff Bags.


quilt #3: rainbow stripes

100 quilts for kids

I couldn’t resist sewing up a fun rainbow stripe quilt. The front is all Kona solids from my stash, and I picked up a playful alphabet fabric for the backing. It wasn’t quite wide enough so I added a bright strip of blue. I’m a big fan of breaking up backs this way. It’s easy and adds a nice graphic punch to it.

100 quilts for kids

I used the blue, as well as a little pop of red, for the binding. I did double rows of stitching along each seam, as well as along the blue strip on the back.

100 quilts for kids

The finished size is about 43” x 47”. This quilt is headed to a local NICU.


quilt #4: april showers color block

100 quilts for kids

My next contribution is this cheerful color block pattern featuring a fun print and bold solids. I picked up this print for about $2 a yard (woo!), and originally was thinking I would just use it as a backing fabric. But the more I looked at it, the more I wanted to incorporate it into the front. Maybe it’s because I’ve been desperately hoping for rain (Los Angeles has been hot hot hot), or maybe it’s because it’s just so adorable!

100 quilts for kids

I used this quilt pattern for a baby quilt I’m working on, and I love it! It’s fun and versatile, and works equally well with prints and solids. I did straight stitching as well as diagonal. I love the combination of the two. And of course, I had to do scrappy binding.

100 quilts for kids

The finished size is about 42.5” x 42.5”. This quilt is going to My Stuff Bags.


quilt #5: pop checkerboard

100 quilts for kids

My final quilt for 100 Quilts for Kids is this fun checkerboard. Simple and graphic, with a pop of hot pink. I used a fun polka dot fabric for the backing, and a coordinating pink for the binding.

100 quilts for kids

I also decided to quilt with hot pink thread just to add a little extra pop.

100 quilts for kids

The finished size is about 40” x 40”. This quilt is going to Project Linus.


I had such a lovely time making all of these quilts. It was definitely a push to get them done, but it was well worth it! I hope the recipients loves them as much as I do :)

100 quilts for kids

If you haven’t already, I’d encourage you to hop on over to Quilts in the Queue and take a look at what everyone else made. There are some fantastic contributions, and I’m sure they will bring smiles and comfort to some very deserving children.

100quilts4kids

Have a great week!

xoxo


100 quilts for kids: progress!

The deadline for 100 Quilts for Kids is right around the corner, so I thought I’d share a quick peek of where I’m at!

100 quilts for kids

What the huh??? OK, I might be having a little too much fun. Or, I’ve gone completely insane. Possibly some wonderful combination of the two… I originally planned on making one, maybe two quilts. But as you can see, those numbers have grown. I couldn’t help myself!

To recap, 100 Quilts for Kids is an annual charity quilt drive that encourages quilters to make and donate a quilt to a child in need. This year it’s being hosted by Quilts in the Queue and it runs from August 1st – September 30th (only a few days away, don’t remind me!).

I’ve been wanting to make some quilts for charity for quite a while, so this was the perfect opportunity.

I gave myself a few guidelines:

  1. use as much fabric from my stash as possible.
  2. pick prints/colors and quilt patterns that just make me happy.
  3. finish one quilt before moving on to another. (obviously, I failed miserably at this one).

Anyway, time to get back to it. Wish me luck! Stay tuned for pics of the finished quilts and info on the charities they’re going to.

And hey, if you’re a fast quilter, there are still a few days to get in on the fun! Info and guidelines can be found here.

100quilts4kids

Have a lovely weekend!

xoxo