
Halloween is tomorrow (ahhhhh!), but this vampire bat softie was just too cute not to share!

This little guy is fairly easy to put together, and makes a great toy or decoration. And adding crinkle material in the wings makes it even more fun!
Materials:
- black/red felt for body and pupils
- white felt for eyes and fangs
- coordinating embroidery thread
- stuffing
- crinkle material (optional)
- basic sewing supplies (machine, needle, scissors, pins, etc)
- pattern (available here)

* I used two different shades of red, just for the purpose of this tutorial.
Unlike the eyeball and candy corn softies, I did most of my assembling for this on the sewing machine.
Step 1: print and cut your pattern, then cut your felt pieces. I’d recommend cutting both body pieces at the same time, as well as each pair of wings.
Step 2: place your wings right sides together and pin (if you cut them at the same time, you can just leave them as is and pin).

Step 3: sew each pair of wings, leaving the straight end open for turning. Remember to back stitch and the beginning and end.
Step 4: trim your corners and clip/notch your curves.

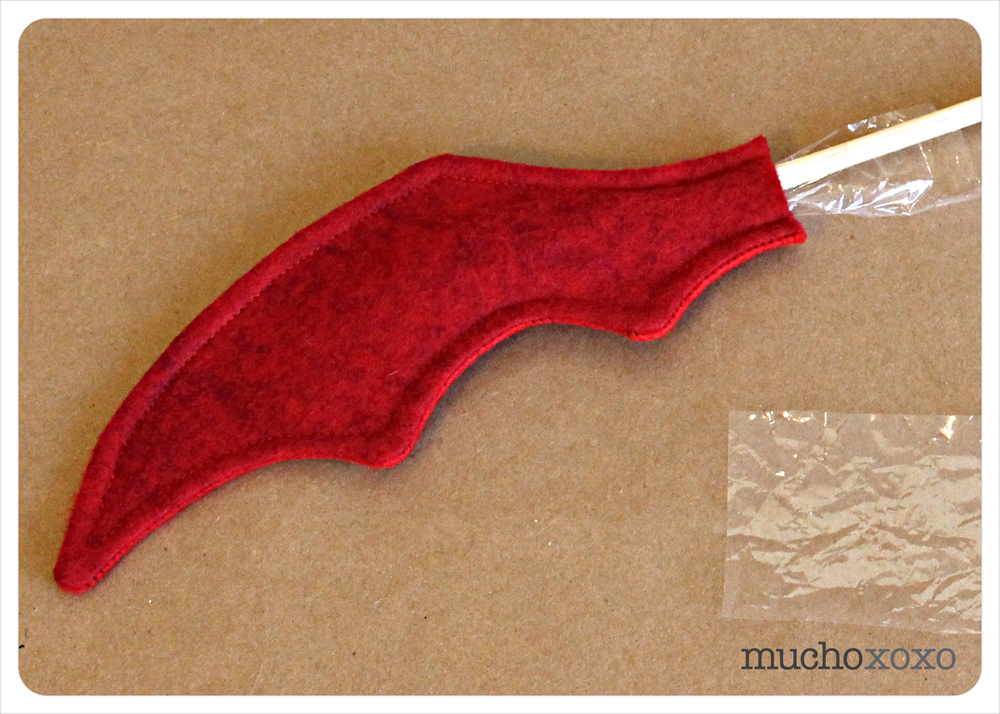
Step 5: turn your wings right side out. It’s a bit of a tight squeeze so take your time. You can use a chopstick to help with the corners.

Step 6: iron the wings and then topstitch. Again, leave the straight end open.
Step 7: stuff each wing with a small amount of crinkle material (optional). You can use a chopstick so make sure it’s spread evenly and reaches the tips.
Set the wings aside and move on to the body.
Step 8: sew your face to the front body piece. I placed my eyes first and then drew my mouth with disappearing ink and used a simple back stitch.

Step 9: once you’ve finished the face, you’re ready to assemble. I would recommend stitching the ears and wings into place. I did this on the machine with a larger stitch, as close to the edge as I could get (indicated by the dotted lines below). This will ensure that nothing moves around while you’re sewing the body.

Step 10: time to pin! Fold in your wings so they are as compact as you can get them. Pin all around. Where the wings stick out will be your opening for turning and stuffing.

Step 11: sew the body. Don’t forget to back stitch at the beginning and end. I also backstitched over the edges of the wings, just to reinforce them. Trim your wing excess and clip your curves when you’re finished.

Step 12: turn your bat right side out. I’ve found that if you hold the opening with one hand and gently tug the wings with the other, it will start to turn fairly easily. Once it’s right side out, give the ears and wings a little tug to make sure they’re fully out.
Step 13: stuff with crinkle material (optional) and stuffing. Use small pieces of stuffing to ensure you get it nice and full.

Step 14: when you’re done stuffing, close up your opening with a ladder stitch. If you’re unfamiliar with the ladder stitch or need a refresher, check out this great tutorial with very clear step-by-step instructions. You may want to add a bit more stuffing as you close the opening. Once you’ve reached your starting point, tie it off, bury your thread and trim. And that’s it! A little vampire bat buddy to keep you company!

So much cuter than the real thing, huh?

Have a Happy Halloween!
xoxo
