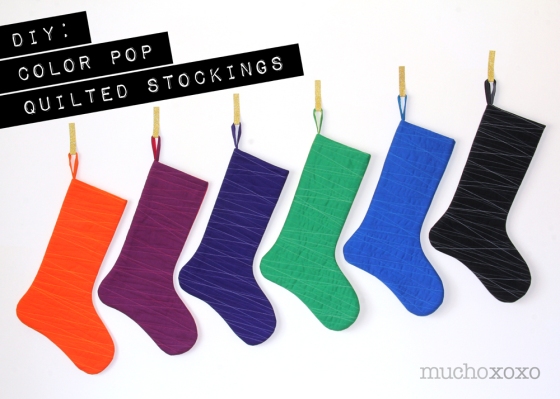
Christmas is coming, it’s time to get into the holiday spirit! Why not add a little pop of color to your decorations with these candy-colored stockings!
My family is pretty big on stockings. We’ve had an odd assortment over the years, some made by mom, some store-bought. So with the addition of my awesome little nephew to the family last year, it was the perfect opportunity to make a new one, not just for him but for everyone. I knew I wanted something fun, non-traditional, and of course, easy to do (I was making 6). I decided to use a technique that I absolutely love for quilts. It’s pretty straight-forward and just takes a little patience.
The great thing about these stockings is how versatile they are. I chose jewel tones for ours, but you could also go with more traditional holiday or winter color schemes as well. The options are endless.
Materials:
- exterior fabric – approx. 1/2 yard per stocking
- lining fabric – approx. 1/2 yard per stocking
- coordinating/contrasting thread in a variety of colors (I used 5)
- batting
- basic sewing materials (machine, pins, scissors, etc.)
- basic stocking pattern (available here)
Step 1: print your pattern (make sure printer is set to 100%, not fit to page). Line up pages where indicated and tape together. Cut out the paper stocking and set aside.
If you want to pre-wash your fabrics, do that now. I chose not to. Just keep in mind that if you don’t, your stockings will shrink if/when you wash them.
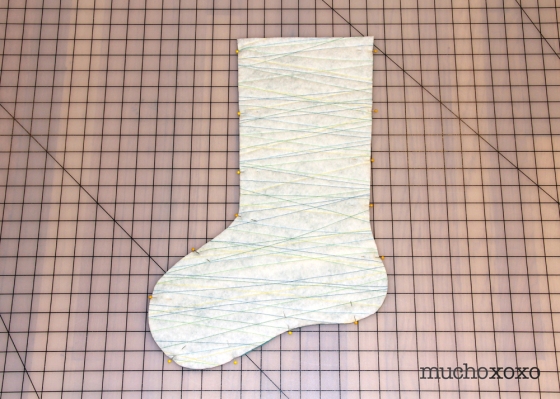
Step 2: quilt your exterior pieces. You’re going to do this BEFORE you cut them out. I was working with approximately 1/2 yard pieces of fabric, so I simply cut them in half. But you can really make them whatever size you want, as long as it’s larger than the stocking. As you can see from the image below, I’m working with a piece that is larger than I need. I’ll use my leftover quilted fabric for other projects (more about that later).
Cut your batting to size with your exterior pieces and pin-baste together in a few spots.
I opted not to trace my stocking onto my fabric before I quilted. I kind of like being surprised. And since I will use the leftover fabric, I just want to quilt the whole thing evenly. If you’re going to trace the stocking onto the fabric, don’t forget to flip it on one so you have mirror images.
Now it’s time to sew! If you have a walking foot, break that baby out now.
Choose your first thread color. You’re just going to make your way back and forth at a slight angle across the length of the fabric. When you get to the end, work your way back across. Repeat on your second exterior piece. Change your thread color and repeat. Continue until you’re happy with how it looks.
This is my favorite part. It’s also the most time-consuming step. With all of the back and forth and changing threads, it can get a little tedious (try making a whole quilt this way!), but the end result is totally worth it.
Step 3: cut your pieces. If you have good scissors, you can cut your exterior pieces at once, but that’s up to you. If you’re going to cut them at once, place them right sides together and trace your stocking. I used a few pins to hold the pieces together while I cut. If you’re going to cut them one at a time, don’t forget to flip your pattern! You want your exterior pieces to be mirror images of each other once they’re cut.
Place your exterior pieces right-sides together and pin. Set aside.
Repeat these steps with your lining fabric.
Step 4: sew your exterior pieces together. Using a 3/8” seam allowance, sew around your stocking, leaving the top open. Don’t forget to backstitch at the beginning and end.
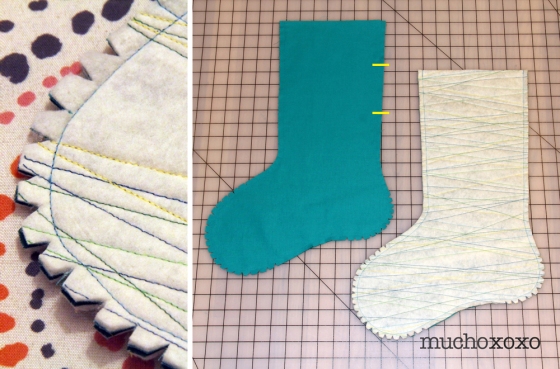
Repeat this step for your interior fabric, but make sure to leave a 3-4” opening in one side for turning (indicated below).
Trim your fabric and clip/notch your curves where needed.
Turn your exterior piece right-side out and set both stocking pieces aside.
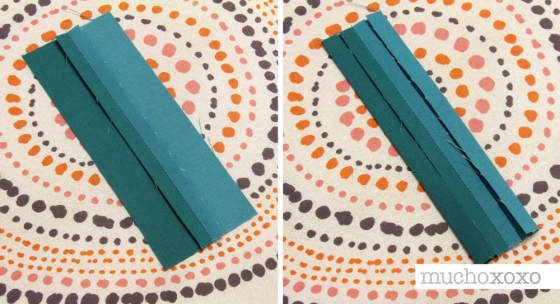
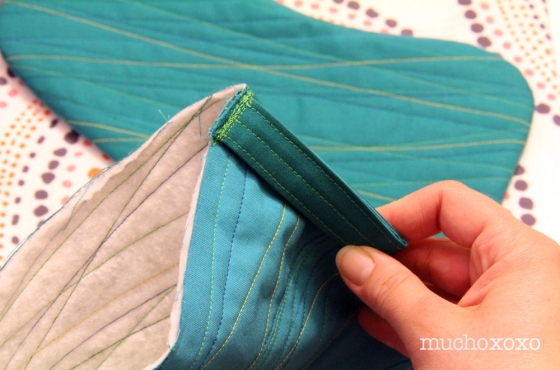
Step 5: make your hanging loop. Cut two strips of fabric to 1 3/4” x 7” and place right-sides together. Stitch down one side with a 3/8” seam allowance. Iron open. Press each raw edge in towards the center to line it up with the interior raw edge.
Fold in half and iron (finished size will be approximately 3/4” x 7”). Stitch down each side, close to the edge, then again down the center.
Fold the strip in half to create your loop and press again. If you want, you can stitch the loop closed. This helps keep it from slipping while sewing.
Step 6: attach your hanging loop. Line up the raw edges of the loop and stocking and center on the back seam and pin into place.
Use a 1/4” seam allowance to attach your loop. Go back and forth a few times to reinforce this.
Step 7: attach your lining and exterior pieces. With your lining inside-out, and your exterior fabric right–side out, tuck the exterior into the lining.
Line up your seams and raw edges and pin into place.
Sew all the way around with a 1/2” seam allowance. I would recommend backstitching over the loop again once or twice to reinforce it.
Step 8: use the opening in the lining to turn your piece right side out. You’ll end up with the exterior fabric and lining pointing away from each other.
Iron your opening and then stitch closed. I hand stitched mine closed but you can do this on the machine if you prefer.
Step 9: push the lining into the stocking and smooth out your fabric.
Iron your stocking. Top-stitch around the top edge to finish it off.
And you’re done! Hang your stocking and enjoy!
Have a colorful Christmas!
xoxo







Love them!
Saw this on craftgawker!! Love your images and tutorial :)
Thanks Marni! :)
Pingback: hooray! it’s giveaway day!!! | mucho xoxo
Pingback: 20 Homemade Stocking Ideas To Hang By The Chimney With Care - Pioneer Settler | Homesteading | Self Reliance | Recipes
Pingback: Color Pop Quilted Stockings – Needle Work
Pingback: Color Pop Quilted Stockings | It's Handmade
Pingback: 20 DIY Stocking Tutorials - Busy Moms Helper