
Halloween is quickly approaching (eek!), so I decided to get into the spirit with some fun and easy felt projects. First up, a big eyeball!

These make great decorations, or you can add some crinkle material and a rattle insert for a fun and [not too] spooky toy for a little one!
Materials:
- white felt for eyeball and highlight
- black felt for pupil
- colored felt for iris
- coordinating embroidery thread
- stuffing
- crinkle material (optional)
- rattle insert (optional)
- interfacing (optional)
- basic sewing supplies (needle, scissors, pins, etc)
- pattern (available here)

This guy comes together in a cinch. I did everything by hand but it could easily be done on the machine. These directions are for the hand sewn version
Step 1: print and cut your pattern and then cut your felt pieces. (2 large white circles for eyeball, 1 colored circle for iris, 1 black circle for pupil and 1 very small white circle for the highlight). If you’re going to use crinkle material, cut it slightly smaller than the large circle.
Step 2: attach the iris, pupil and highlight to one of the large white circles with embroidery thread. I chose a contrasting color to stand out against the green (reminds me of a poisonous frog). The color combos are endless, so have fun with it! Optional – you can add red stitching radiating in from the edges to make the eye look bloodshot.

Step 3: if you choose to add interfacing, now’s the time (I used Pellon Shape Flex). I would recommend this step especially if you plan to hand stitch your pieces. It adds a little reinforcement to the felt. I opted to iron and trim it after I sewed the iris/pupil/highlight. It covers up the stitching nicely (shown below right) and you won’t have to worry about snagging it when you add the stuffing. And the blanket stitch does a great job of hiding your edges, in case you’re worried about the interfacing showing.

Step 4: once you’re happy with the look of your eye, place your finished front piece on top of the second white circle, wrong sides together, and pin.
Step 5: blanket stitch your pieces together, leaving a 2” opening. I used red embroidery thread to make it look a little bloodshot. If you’re unfamiliar with the blanket stitch or need a refresher, check out this great project with very clear step-by-step instructions. The blanket stitch uses a surprising amount of thread and can vary greatly depending on how close you place your stitches, so be prepared!

Step 6: stuff with crinkle material (optional) and stuffing. Use small pieces of stuffing to ensure you get it nice and full.
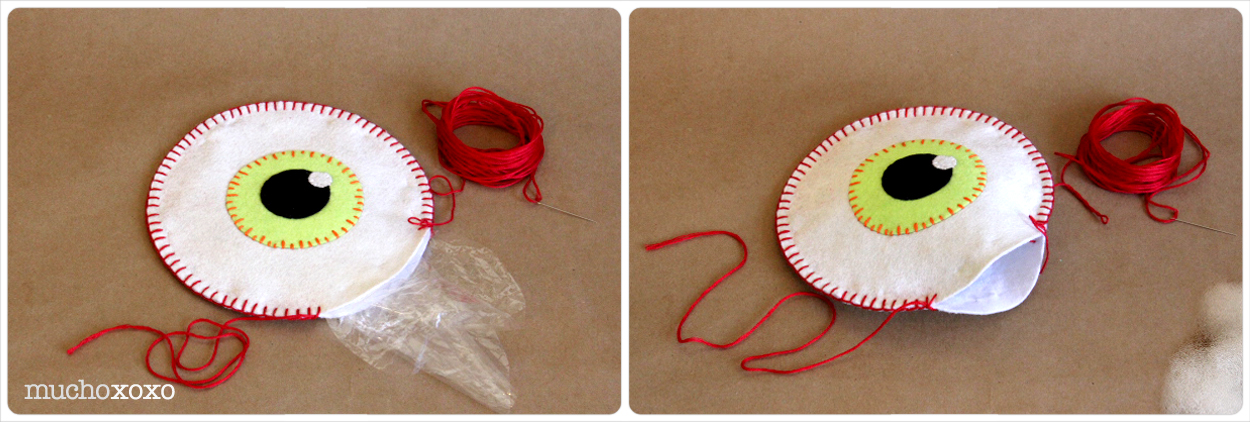
If you choose to add a rattle insert, try to place it towards the center. Not sure where to purchase crinkle material or rattle inserts? I get mine here.

Step 7: when you’re done stuffing, continue your blanket stitch to close up the opening. You may want to add a bit more stuffing as you close the opening. Once you’ve reached your starting point, tie it off, bury your thread and trim.

And that’s it, a spooky eyeball of your very own!
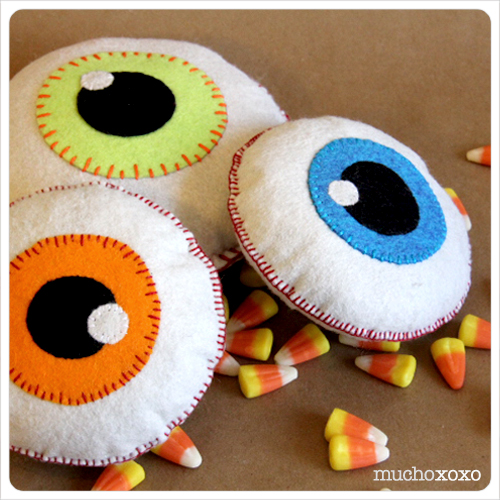
Couldn’t be easier, right? Go ahead, make a bunch!
Happy haunting!
xoxo

these are so funny! and cute:)
So crafty, and what a great presentation! XXOO, OMO
Sent from my iPad
Pingback: vampire bat softie | mucho xoxo
Pingback: Tutorial: Eye See You – Needle Work
eek! You’re a gam! And, you’re over here on wordpress yay.. I have a couple questions to ask maybe you could help with. Do you have a contact page with the direct email option here on your blog? I’d rather email… I love this project & I am going to attempt it with my 5yr old. Just have questions first! Pinned, shared & google Plus’d. See ya round
Thanks Jeanine! I’m actually in the process of adding a Contact page but for now you can find my email address on my About page. :)
Pingback: Feltastic Halloween DIY | Craft Hackers
Pingback: Top Ten Tuesday {Halloween} | AURIbuzz
Pingback: 13 Simple Halloween Sewing Projects For Beginners! - It's Just Sewing
Thanks for sharing! I want to make these for my son. What kind of needle do I need to buy? TIA
I think I just used a regular embroidery needle. The wool felt was easy to stitch through, so anything with a large enough eye for your thread should be ok. Happy sewing!
Hello, How many strands of embroidery thread did you use?
I believe I used all of them so the stitching would be very visible :)
Pingback: 20+ Free Halloween Sewing Patterns & Projects – Bobbin and Button
Pingback: eyeball softie pattern and tutorial source: muchoxoxo.com/… – Halloween