orange peel quilt-a-long

Well, I had so much fun with the last QAL that I’m jumping in on another! This one is for the orange peel quilt-a-long, hosted by Julie of button-button.

orange peel qal

In keeping with pushing myself to try new things, this project definitely fits the bill. The technique we will be using to make the orange peels is all hand-stitched appliqué. I’m a little afraid of anything involving hand stitching so this will be a challenge. But I’m looking forward to learning something new!

If you’ve been tempted to join in on a quilt-a-long but have been worried about feeling rushed, this might just be the perfect one for you! The plan is to go at a nice easy pace. You can also pick your project size based on how much time you think you’ll have. Better yet, you don’t really even have to decide on a finished size to get started, since you make one block at a time. I’m planning on doing a lap-sized quilt, but this would be fantastic as a mini or even a cushion.

Head over to button-button for all the details. Julie has also posted about materials and fabric choices here to get everyone started. I’m still a little stumped about fabrics, but reading her post definitely gave me some ideas.

I’ll be sharing my progress along the way, here as well as on instagram, so stay tuned for more!

Have a fantastic weekend :)

xoxo

robot summer shorts

So, Summer Kid’s Clothes Week has come and gone… I didn’t get as much done as I wanted, as I was knee-deep in the Sea Breeze Mini QAL. But I did find time to make a few things that I’m happy with. First up, this fun pair of robot summer shorts!

RobotSummerShorts

I used the free Summer Shorts pattern from Caila Made, found here. This is a great unisex shorts pattern, and a quick and easy project. And I’m loving this playful FunBots print from Ann Kelle.

The only thing I did differently from the directions was to reinforce the seams for added durability. Made By Rae has some fantastic tips on sewing seams that are built to last.

RobotSummerShorts

Seeing as these are for my very active 2-year-old nephew, reinforced seams seemed like a good idea. Not to mention, no raw edges to fray with repeated washings. Definitely worth the extra effort.

RobotSummerShorts

I also added a bit of grosgrain ribbon to help identify the back from front :)

RobotSummerShorts

Can’t wait to show you what else I made, just have to wait for it to get to the recipient so I don’t spoil the surprise!

xoxo

quilting for a cause: 100 quilts for kids

100quilts4kids100 Quilts for Kids is an annual charity quilt drive that encourages quilters to make and donate a quilt to a child in need. This year it’s being hosted by Quilts in the Queue and it runs from August 1st – September 30th. There’s still plenty of time to get involved in this quilt-a-long for a great cause. Last year nearly 200 quilts were donated, and they’re hoping to surpass that this year.

If you’ve ever thought about making a quilt for charity, here’s your chance!

All the info you need to get started can be found here.

xoxo

sea breeze mini QAL: the big reveal!

You guys! It’s the big reveal day for the Sea Breeze Mini Quilt-A-Long! And my quilt is actually done! Woo! I had such a blast making this, can you tell?

sea breeze mini qal

I’m so happy with how the top turned out. The more I look at it, the more I love it! Such fun, vibrant colors. It just makes me smile.

I decided to keep the back simple and let the quilting be the main attraction. I used an awesome neon yellow thread from Coats & Clark. It’s intense, but I couldn’t resist!

sea breeze mini qal

I struggled a little with how exactly to quilt this. I knew I wanted to try something different and I’m pretty satisfied with how it turned out. And by the time I was done, I was much more comfortable burying my threads (bonus!). It just took a little getting used to :)

sea breeze mini qal

In keeping with the bold graphic look, I pulled a fun black and white print from my stash. Go big or go home, right?

sea breeze mini qal

So that’s it! I hope you love it as much as I do.

sea breeze mini qal

I’ve had such a great time being part of this quilt-a-long, I’m a little sad to see it come to an end! I’m completely blown away by all the fantastic translations of the Sea Breeze Mini Quilt pattern. What an inspiring group of quilters!

Thanks again to Angie for being such a fantastic host. Be sure to head over to Gnome Angel to see all the finished pieces. And you can vote for your favorite while you’re there! Voting is open 5 August 9:00am AEST – 7 August 5:00pm AEST (or for my friends in the States, August 4th at 4pm PDT – August 7th at 12am PDT… did I do that right?).

SeaBreezeMQAL

Have a good one!

xoxo

sea breeze mini QAL: meet my mini!

Hello all! Welcome to the halfway point of the Sea Breeze Mini Quilt-A-Long! Have you been keeping up with all the amazing contributors so far? It’s been quite a week! A big BIG thank you to Angie for being such a phenomenal host (and her incredibly kind words in my introduction on her blog!)  :)

This is my first QAL, and I have to say that I was a little nervous about joining in with such a talented group of quilters. But if I’ve learned anything, it’s that the quilting community is incredibly supportive and welcoming! And so with that, I was ready to jump in!

As usual, I gave myself some parameters to work with…

  1. I have to use fabrics from my stash.
  2. follow the pattern.
  3. break the pattern.

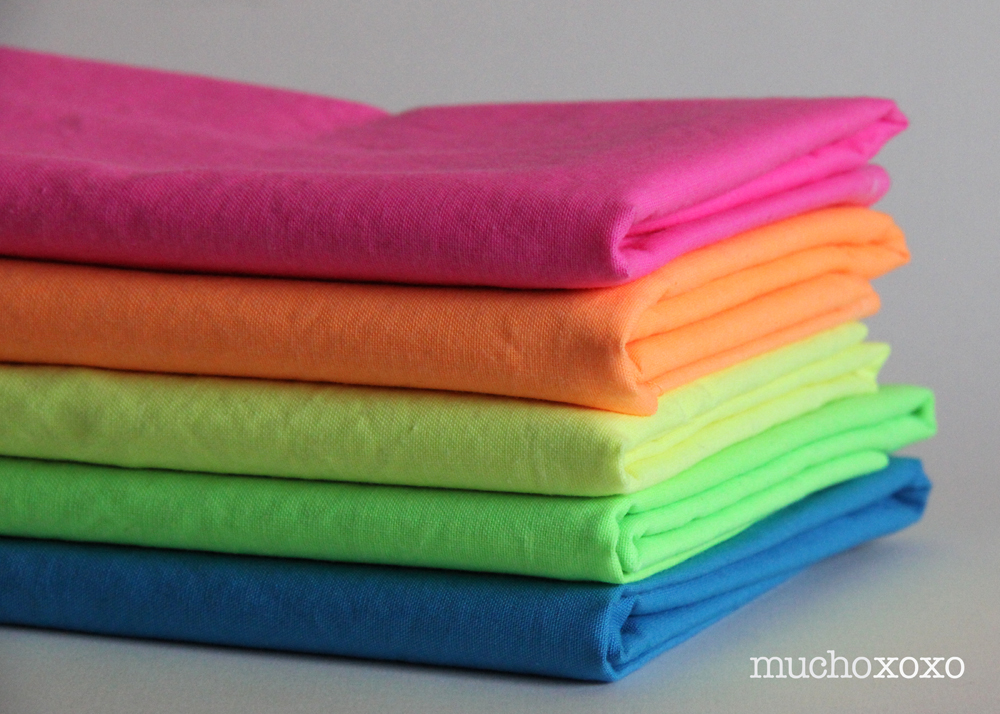
First, it was time to pick fabrics. Originally I was leaning towards prints, but ended up going for solids. What can I say? Old habits die hard! I decided on these awesome neon solids from Riley Blake. Aren’t they so fun?

Sea Breeze Mini QAL

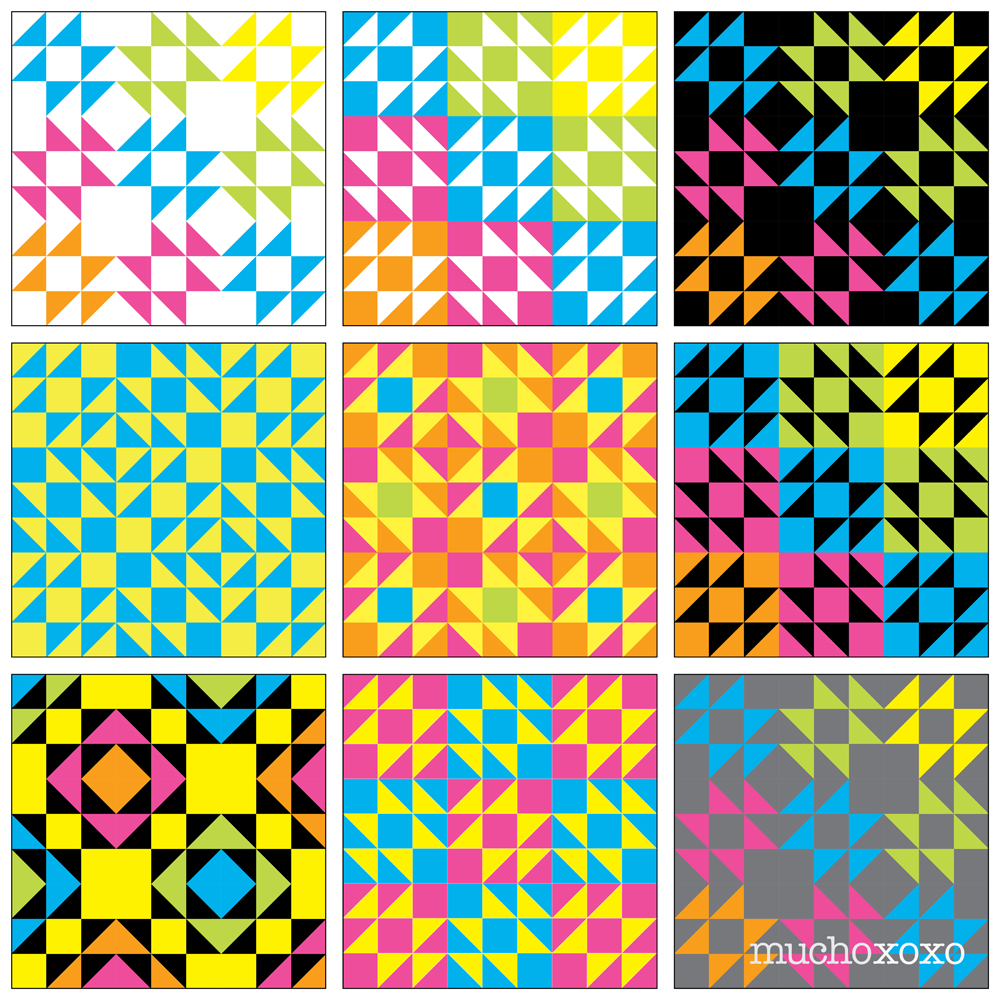
Once I had my main fabrics picked, it was time to start playing with possible color arrangements. I planned on adding black or white for my background color but kept it open as I started to try things…  I made a quick mock-up in Adobe Illustrator and got to coloring! My only rule was I had to leave the block placement as it was in the original pattern. I went through quite a few ideas. Some kept closer to the original look, others went pretty far out there… I almost always try layouts out in Illustrator first, unless I’m doing improv. Just to give you an idea, here are some of the options I came up with.

Sea Breeze Mini QAL

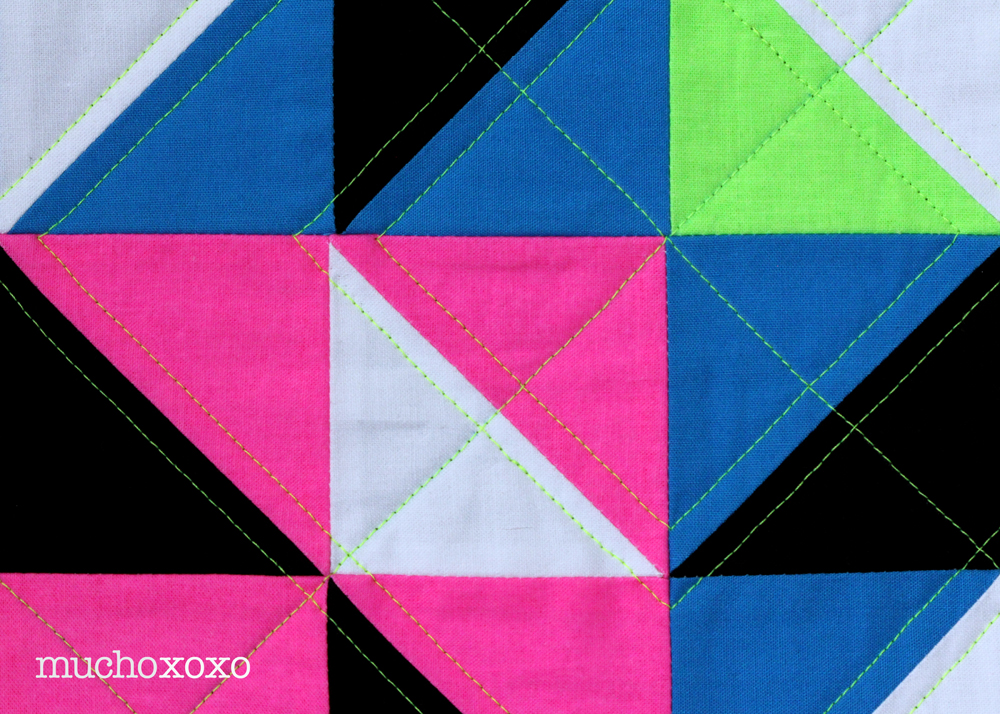
It was fun exploring all the different ways you can break up the pattern. As usual, I used my family and friends as a mini focus group. And as usual, they all had a different favorite. I took cues from the ones they liked and came up with this layout. I love how the black and white balance out the neons, and it still really highlights the pattern. It’s simple and graphic, right up my alley!

Sea Breeze Mini QAL

This was my first time with half square triangles (HSTs), and I can see why they’re so popular. They’re incredibly versatile, and it’s a great way to get a number of blocks done quickly. If you haven’t tried them, you should give it a shot! This pattern has you make them in the traditional method, but there are a number of tutorials on how to create as many as 8 or even 18 HSTs at a time!

Sea Breeze Mini QAL

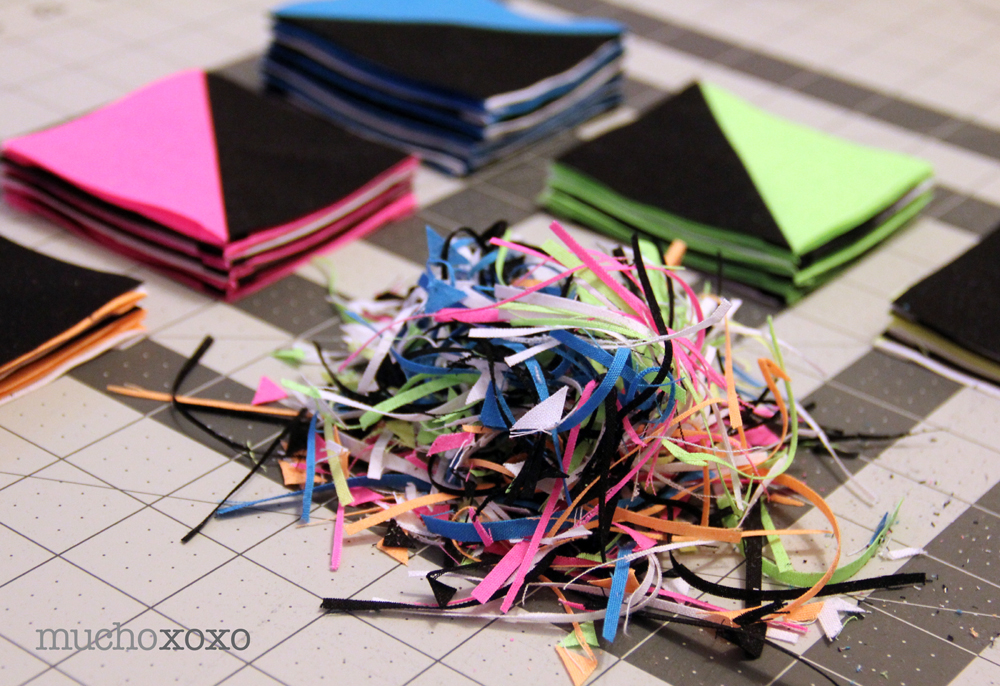
I chain pieced all of my HSTs, fast and easy. Then it was time to iron and trim. It’s been so hot in Los Angeles, I was grateful that I only had a mini’s worth of pieces to press!

Sea Breeze Mini QAL

I used my standard square ruler to trim the HSTs. It worked fairly well, but I can definitely see the appeal of the bloc loc. If you’re new to HSTs and a little worried about squaring them up, a helpful trick is to make your starting squares slightly larger than is called for. This will give you a little more wiggle room to get your seams perfectly lined up on the diagonal when you trim.

Sea Breeze Mini QAL

Such happy little scraps!

Sewing the quilt top was fairly quick. I had a few issues with things lining up, and I did have to rip out a few seams and try again. They’re not all perfect but I’m happy with the final result.

Sea Breeze Mini QAL

So here it is, my finished quilt top… Now I just have to quilt and bind this little bugger! Hmmm, what to do, what to do!

I’ll be sharing my finished quilt on August 2nd. Keep an eye on Instagram for some sneaky peeks until then. Be sure to hop over to Gnome Angel to learn more about all of the participants and see their fantastic takes on this great little quilt. There’s also still plenty of time to get in on the fun and make your own Sea Breeze Mini! Angie’s site has all the info you need to get started. The incredibly talented Ms Midge is hosting a progress link party here, go check it out! And if you’re participating, be sure to link up your progress so everyone can see what you’ve been up to :)

SeaBreezeMQAL


Have a fantastic weekend!

xoxo

summer kid’s clothes week, eek!

kcw summer 2014

Summer Kid’s Clothes Week starts tomorrow, and I am completely unprepared! I’ve been so preoccupied with the Sea Breeze Mini Quilt-A-Long (which also starts tomorrow) that I haven’t really planned anything!

I’ve been thinking about a few things I’d like to make, and I’m going to give it my best to make up for my lack of planning ;)

This time around, the inspiration is “kid art.” I predict we’re going to see lots of fun prints and playful designs. I have a few prints in my stash that might have to come out and play for this.

I’ll be sharing snippets and peeks along the way on Instagram and all of my finished projects right here.

So, who’s in? What do you have planned for KCW?

xoxo

my first aztec hooded vest

Seeing as Summer Kid’s Clothes Week is next week (eek!), I figured it was time to share my last project from Spring KCW!

Here’s my take on the fantastic Aztec Hooded Vest from See Kate Sew.

AztecHoodedVest

I held off on sharing during the actual week because I wanted to keep at least one thing I made a surprise for the recipient (well, his mom). And then, of course, I completely forgot about it! So I’m sharing it with you now… Better late than never, right?

The pattern is available from See Kate Sew here. The instructions were clear and easy to follow and it came together fairly quickly. I used a super soft navy sweatshirt fleece for the outside, and the inside is another favorite print from Jay McCarroll. I’m loving the combination of navy and mustard.

AztecHoodedVest

Pretty fun, isn’t it? And yes, it’s completely reversible!

AztecHoodedVest

As suggested, I added some topstitching to the outside to give it a bit of a quilted look. It’s subtle, but a very nice detail. And the open welt pockets are a fun addition. I love that the lining fabric just barely peeks out.

AztecHoodie_detail2

And what about that oversized hood? Too cute!

AztecHoodedVest

I think my biggest struggle was finding the right reversible zipper… Until I realized how easy it was to make my own! This was a bit of a “duh” moment for me. I’ve altered plenty of plastic zippers, but the thought of doing this to a metal zipper never crossed my mind.

AztecHoodedVest

It’s totally doable, and really not that hard! Here’s a great tutorial if you want to give it a try.

AztecHoodedVest

I bought a metal reversible separating zipper from Jo-Ann Fabric to start with. This one has a double-tab zipper pull (above left), which means that each side has its own pull. I wasn’t crazy about how it looked so I ordered a replacement pull like this (above right). I also picked up a few extra top stops (those things that keep your zipper from coming off the ends). These are good to have if you’re planning on shortening zippers. You can sometimes reuse the originals but they’re nice to have just in case one breaks. And keep in mind, if you’re ordering replacement pieces, make sure you order the correct size!

AztecHoodedVest

Over all, I’m very happy with how this turned out. I’ve already got a few more planned in my head… And is it weird that I want one in my size too?

Have a wonderful weekend!

xoxo

sea breeze mini quilt-a-long

I’m super excited to be part of the upcoming Sea Breeze Mini Quilt-A-Long, hosted by the lovely and talented Angie of Gnome Angel!SeaBreezeMQAL This will be my first quilt-a-long (aka QAL) and I’m looking forward to seeing what everyone does! Angie has put together a great group of bloggers and instagrammers to share their process, as well as tips and motivation over the two week period (7/21 to 8/2). I’ll be posting my progress on July 26th and revealing my finished mini on August 2nd. I can’t wait!

There’s still plenty of time to get in on the fun! The pattern is from Canoe Ridge Creations, available here. And you can read more about the quilt-a-long here. Angie has started a Facebook group for participants and will be posting a link party where you can link to your final quilt on either your blog or via Instagram. (Not sure what a link party is? Read about them here.)

Keep an eye on Angie’s blog in the coming weeks for more info. I’ll be sharing sneak peeks of my quilt via Instagram, and you can search #seabreezemqal to see what everyone is up to. So come and join us! Whether you make your own or just follow along, it’s sure to be a good time!

xoxo

improv mini quilt: radiant gem

Ok, I just missed getting this into the Blogger’s Quilt Festival going on (bah!), but I’m so smitten that I couldn’t wait to share it… Say hello to Radiant Gem! (I’m also calling it my happy accident quilt). This is my first attempt at improv quilting, and I think I’m hooked!

radiant gem quilt front

Remember the quilt I made for the Radiant Orchid Quilt Challenge? Feels like so long ago that I finished it! Not only was I left with a comfy quilt that makes me happy every time I look at it, I was left with a sizable pile of pretty little scraps.

radiant gem quilt scraps

Those scraps sat for some time, staring at me… Then one day I finally said enough and decided to throw them out. But as I started sifting through all the beautiful orchid hues, I couldn’t bring myself to do it. So I sat down at my machine, and set the disorganized pile of scraps next to me. And I just started sewing. No plan. No vision for the end result. I just sewed… Pick up a piece. Sew. Add another. Just keep going. (With lots of ironing along the way, lots). At some point, I stopped, set the improv “what-the-heck-is-this-thing” on the floor and stepped back. I walked around it, and wouldn’t you know it, a little gem had begun to take shape!

radiant gem quilt detail

I added a few more pieces where they were needed to emphasize the gem, and then I just grabbed all of the scraps of the same color and started sewing until the size felt right. It looked a bit plain so I added a few additional colors to the corners. So glad I did, I really love this little detail.

radiant gem quilt corner

I also decided to give matchstick quilting a try for the first time. It’s tedious but I love it. And the variegated thread is just perfect for this.

radiant gem quilt detail

I used a solid color for the back to really show off the quilting. And of course I had to do scrappy binding. The finished size is about 27×23 inches. Not sure what to do with it yet. Maybe a wall hanging?

radiant gem quilt binding

So that’s it. That’s how this little Radiant Gem came to be. I wish I had taken pictures along the way but I really didn’t think it would turn into anything worth keeping. Live and learn, right? ;)

radiant gem quilt detail

Have a great weekend!

xoxo

kid’s clothes week: just hatched leggings

These itty bitty leggings are just the cutest things, aren’t they?

JustHatchedLeggings_muchoxoxo

I don’t have a serger, and I’ve never really sewn knits on my standard machine (although you’d never know it by the number of them I have in my stash). I’ve wanted to try, but like so many people, I was a little apprehensive to take the plunge. So when I saw this pattern from Made By Rae, it seemed like a good starting point. Simple pattern, and only a small amount of fabric needed. Besides, how can anything so incredibly cute be intimidating? Right???

I read quite a few articles and posts with tips and tricks for sewing with knits (here’s a good one if you’re looking for somewhere to start). After all of the reading (and worrying), the biggest lesson I learned is that there’s really no reason to be afraid of knits! It’s that simple. Test your fabrics. Try things. Expect mistakes, and don’t give up!

My fabrics were all slightly different, and I learned more with each tiny pair of leggings I sewed…

white and black arrow

white and black arrow cotton spandex knit

fawn silhouette

fawn silhouette cotton jersey blend

feathers on silver peony

feathers on silver peony cotton jersey blend

These are so stinkin’ cute, and they come together so very quickly once you get the hang of things. With the number of people I know that are expecting little ones, I can’t wait to make more!

xoxo